Teach hackers to not hack!

We need to teach people to not hack instead of teaching people to not get hacked!

— Said no computer security specialist, ever…

Just as guys learn how to overtake women in order to rape, computer hackers learn their trade in order to cause harm to others – the "black hat hackers" including the ones who got ahold of pictures celebs like Jennifer Lawrence were storing on iCloud. The outstanding question is how the pictures were stolen, as that will determine the course of action needed to be taken by others.

There are steps you can take to reduce the likelihood you’ll be a victim of any kind of crime. You can lock your doors and make other changes/arrangements to your property to prevent burglaries. You can use a car alarm and other such devices to prevent car thefts – to varying degrees of success. Online you can generate secure passwords to prevent accounts from being hacked.

And there are measures a woman can take to reduce the likelihood she’ll be raped.

If Lawrence’s and other celeb accounts were hacked by guessing passwords, they need to use better passwords. If they were hacked by infiltrating the iCloud system, then there was nothing that Lawrence or others could have done, and the entire security breach rests on Apple.

Or perhaps we could tell hackers to not hack instead of Apple needing to beef up their security. After all, if we just taught hackers to not hack, then computer security wouldn’t be needed.

Again, said no reputable computer security specialist. Ever.

Games for Windows Live (GfWL) and Windows 8.1

If you are:

  • Running Windows 8.1 or 8.1 Pro
  • Trying to log into Games for Windows Live Marketplace

because you have a game that requires it (such as GTA IV), then before you will be allowed to log in, you need to make sure the account you are using on Windows 8.1 is connected to the Microsoft/XBOX Live account you are attempting to log into on the Games For Windows Live Marketplace application.

If your account is not linked up with your Microsoft account, you’ll get some nifty authentication errors attempting to log in.

Microsoft, please address this!

Stopped by police while carrying, revisited

Prior to this past evening, I had not been pulled over since 2010 when I got nailed for speeding. At that time I did not even own a firearm. This past evening, I was pulled over because one of our headlights was out. We were able to confirm such at a nearby gas station, where we were headed anyway.

When pulled over, after informing me he pulled us over for the headlight, he requested my license and insurance information, and I plainly informed the officer of my permit and the weapon I had on my person – lines I’d practiced numerous times. I had already pulled my money clip from my pocket and put it on the center console before the officer approached, my wife went for the insurance information, so everything else happened in plain sight of the officer.

I handed him the insurance info first, since my wife found that in short order, and then I handed him my license, then the separate ID with my CCW endorsement. He handed back that ID before taking my license and insurance information back to his car. When he returned to let us off with a warning about the light – i.e. get it replaced within a reasonable time frame – he thanked me for voluntarily disclosing that I had a weapon.

Computer build tip: External enclosures, revisiting cable management

A lot of your time in building a computer is going to go into cable management. In October 2013, I upgraded the power supply in my wife’s computer from a Rosewill 500W supply to a Corsair GS850 in preparation for higher-end upgrades coming down the road. In making that changeover, I spent probably three hours on cable management in the mid-tower case that housed it. In building out a water cooling loop in her full tower case, again a lot of time went into cable management.

Mid-tower cases do not leave you a lot of room for managing cables, and there tends to not be a lot of space, if any, behind the mainboard tray for routing and management. Modular power supplies have made the task only a little easier by allowing you to reduce the cable bulk. And reducing cabling is really the only way you can make cable management easier. Even with full tower cases, you’d probably still want to make your life easier.

On this mark, one thing I’m surprised I don’t see advocated more often is the use of external enclosures.

Enclosing the past – USB and eSATA

Now in the past this path has been problematic.

First, USB 2.0 is slow compared to the bandwidth available SATA I – 480 Mbit/s for USB 2.0, compared to 1.5 Gbit/s for SATA I. Even ATA-4, the last PATA standard, was twice as fast at nearly 1 GBit/s. Most hard drives today are also faster than what USB 2.0 can support – SSDs most certainly are – so trying to use a USB 2.0 device as a primary boot device would mean a significant performance penalty.

If you search through Google for articles on trying to run Windows from an external hard drive, you’ll also find that it was problematic and certainly not recommended, though in most cases the discussion focused around USB external devices. I found an article from December 2008 discussing the pitfalls of trying to do this. It was apparently still doable, it just would’ve required a bit of work, and there was no guarantee on stability.

Even with today’s systems and Windows 7 and 8.1, there is still no guarantee it’ll work from a USB 3.0 device. The reason is that USB has traditionally been purely plug-and-play (PnP) with the ability to hot-connect a device (plug or unplug it while the computer is on), and Windows does a PnP device detection during bootup, which could cause your external hard drive to be reset while your computer is trying to boot.

This is where eSATA can make your life much easier, since eSATA goes through the existing SATA bus on your mainboard or SATA interface card. But eSATA as a standard connector option on mainboards didn’t really happen until within the last five years. My previous mainboard I bought in 2007 didn’t have it as an option, and neither did my wife’s. Our current mainboards do.

If you don’t have eSATA connectors, you can buy SATA to eSATA adapters for an expansion card slot, or a SATA controller card with eSATA ports on it, such as this one from SIIG.

Experimenting

Recently I acquired an external RAID enclosure. I’m probably not going to be using it for too long and will replace it with a different one as it doesn’t have all the RAID 1 features I’d like. But the purpose of acquiring the enclosure was to get the hard drives out of my case. I have a full-tower Corsair 750D, and even in full tower cases, hard drive cages affect airflow.

Now many cases have mount points for solid state drives that are completely hidden away – and the 750D is no different. That would only help with airflow, not with cable bulk. Plus SSDs are expensive – to get the kind of storage capacity I currently enjoy through SSDs would cost more than the rest of my computer combined. My wife’s build, Project Absinthe, prompted me to try this. The only thing I don’t like about the build is how the hard drives are mounted. There is better airflow on them compared to the stock hard drive cage that comes with the case, but there’s no doubt they’re a major eyesore.

So the only way to remove the eyesore without breaking the bank is to move everything to an external enclosure. Again this will also help with cable bulk and cable management.

Sure external enclosures can be expensive – especially if you’re going for a RAID cabinet – but it gets an eyesore out of your case while improving airflow. And single-drive enclosures are inexpensive if you’re running only one hard drive. It does leave a void in the case, though, depending on your case and where the hard drive cage is, but if I were running only SSDs, that’d be the situation anyway. In Absinthe, the radiator, pump and reservoir are all in the front section beneath the 5 1/4″ drive bays, and after removing the hard drive cage, I’ll put a fan grill on the exposed fan.

In a build on YouTube by OCTurboJoe called “Neptune 2.0”, he mounted the hard drive in an odd location in his modified case because he couldn’t think of someplace else to mount it and he didn’t want it in view like in his previous build, Neptune. An external enclosure would’ve saved him a bit of a headache on that.

Results

So far I haven’t had any problems with it. As I was migrating an existing system, I needed to image my existing RAID 1 setup before putting the drives in the external enclosure, then write the image back out. It booted without a problem on the first try.

I am also not seeing any performance penalty doing this. I didn’t take any benchmarks, so I cannot say for sure. I’m sure there is probably a small performance penalty, but to me it’s just not noticeable. If you put an enormous amount of emphasis on benchmark numbers, this may not be for you.

One other option as well is to use a pre-packaged external hard drive, but only if there is an eSATA option. This has the potential to be less expensive than buying a hard drive and enclosure separately, but you don’t have control over what hard drive you get, but the performance should still be adequate. I think it’s only if you’re anal about benchmarks, boot times and load times that you might not like that option. Again as attempting to do this through a USB 3.0 device could be problematic, I don’t recommend using that interface.

There are a couple minor downsides to this.

You are removing some cable bulk from inside your case and moving it outside your case. It is one more peripheral to connect to your computer, one more appliance to plug in, so you need to make sure you account for that with regard to your surge suppressor and desk space. If you want to get creative, you can always use 3M VHB tape or high-bond hot glue to stick it to the underside of your desk. It will also use slightly more power than if they were in the case, but it is a negligible difference you won’t notice on your power bill. Make sure to get one that has a fan as well.

In my case, I was able to remove one of the cables from my modular power supply along with several SATA data cables. And not having the hard drives inside the case also improves airflow, which is important for systems with water cooling loops. It can also help maintain positive pressure in your case, which reduces dust, provided your fans are properly configured for that.

Note as well that if you are migrating an existing Windows installation to an external enclosure or external hard drive, you may need to take your system into Safe Mode before it will boot correctly under the “normal” boot option. It may boot clean on the first go, as mine did, but if you encounter problems attempting to boot into it, take Windows into Safe Mode and make sure it boots clean there, then it should boot clean on a normal reboot.

Project Absinthe – Intermission and future plans

Build Log:

Well Absinthe is basically complete now. There’s not really anything left on it. Everything is installed that was planned to be, though there may be some adjustments in the future. I do plan to build out another water cooling loop in my own personal computer in the coming months, and I’ll probably be experimenting with a few things as well in building that out, but I don’t foresee many upgrade paths for Absinthe.

The only plan on the plate right now is just figuring out how to get those hard drives out of the picture. Sure, I could switch them over to SSDs, and she’d certainly love the speed those would bring, but I wouldn’t like the expense: 2 x 1TB SSDs would cost more combined than the components in the loop and the tools I needed to buy to make it all happen.

Instead, I’m going to move them to an external RAID enclosure. I’ve done this with my computer, and it works quite well – though I’m going to be swapping out the current enclosure for something else with better features.

There are three hard drives in Absinthe: 2 x 1TB Western Digital Blacks and an older 250 GB Western Digital drive. The 1TB drives are in a RAID 1 setup, while the smaller drive is for backups. Moving the two 1 TB drives into a RAID enclosure that connects via eSATA, with the spare in another enclosure or removed altogether, will free up space and improve airflow and get rid of what is definitely an eyesore while removing some of the cable bulk. I may also move her Blu-Ray drive into an external enclosure as well, removing another eyesore.

But then with 256GB USB 3.0 sticks out for a reasonable price, and the amount of her hard drive usage being less than that, I could actually move her entire system over to a USB stick and have her run off that – and the read speeds I’m seeing for some of those, it could be better than her hard drive.

Now removing the hard drives exposes the inverter for the bottom CCFL, so I’d either need to move that behind the mainboard tray, if possible, or devise a way of covering it up. Or paint it. Probably cover it up, though.

* * * * *

Cleaner loop and look

JayzTwoCents is documenting on Instagram and YouTube an upgrade on a previous client machine in changing the loop over to acrylic tubing from soft tubing. The results are certainly quite phenomenal.

Before:

This weeks project, rigid tubing conversion. Vlogs incoming

A photo posted by JayzTwoCents (@jayztwocents) on

Now this could’ve been made cleaner by having the pump in a different location, such as finding a way to have it under the reservoir. It’s an AlphaCool VPP655 pump in this build, so he could’ve used a Z2 bracket or something similar to have it on top of the fans on the lower radiator.

In the update, he has it so the pump and reservoir are one unit. And with acrylic tubing, it looks so, so much cleaner.

I think this is a tad cleaner than before

A photo posted by JayzTwoCents (@jayztwocents) on

This is very similar to the previous loop and current loop I built out in my wife’s computer. The original loop wasn’t terrible, mainly because I had the pump and reservoir as one unit, but it certainly could’ve been better. Now the previous loop was my first attempt at a loop, and even with all the reading and videos I’d watched, my inexperience certainly showed. But then there’s no doubt that rigid tubing – whether acrylic, PETG or copper – allows you to build a cleaner loop overall. Even with a new radiator added to the loop over the previous, this build is still much cleaner.

And it’ll be much cleaner when I get those hard drives out of there. If I’m careful, I shouldn’t need to do anything with the loop to accomplish that.

* * * * *

Takeaways and lessons

So what lessons could be learned on this? What did I learn along the way of building Absinthe? Note: some of these might sound like common sense, but it’s often been my experience that things considered “common sense” are the things that need to be repeated the most to ensure you don’t forget them.

1. Don’t skimp on the tools

This doesn’t mean you should max out credit cards or drain bank accounts paying for them either. Annealed copper tubing is typically used for water systems, not water cooling systems. As such, those are the tools you need to consider if you’re going to go with copper tubing. The tubing bender I purchased was made for HVAC professionals. I just needed to shop around to find the best price for it.

There are more expensive options, but I didn’t need to go that route. If I was doing client builds, building out copper tubing water cooling systems for others, then I’d probably consider it to ensure I was building with the best tools for the application. But then I’d also have spent $200 on a tubing straightener or figured out how to build my own – come to think of it, I may consider trying to figure that out anyway before I build out a loop in my personal computer as I’m likely going to use copper tubing for that as well.

2. Practice before building

I went through an entire 10′ coil of copper tubing figuring out a few things before I built the loop. I wanted to know what I was getting into, what the tools were going to do, and figure out any “gotchas” before getting down and dirty. It’s amazing how many people just jump right in with acrylic or PETG tubing without spending a little time learning their tools and figuring out the techniques. That is a formula for waste.

Speaking of “gotchas”, there’s one major reason I went with copper tubing: the bender all but guarantees the angles at which I’m bending. I can trust the marks on the bender better than I can my own judgment of where 90-degrees is. A lot of people who’ve built loops with acrylic have built jigs to assist in getting the 90-degree and 45-degree bends they may need. You may need to do the same if you go with acrylic/PETG tubing as opposed to copper.

There’s a common tip I’ve seen with regard to building out water cooling loops: build your loop outside your case before you build it inside your case. That sentiment is not just about planning, but about practice. It’s why I wanted to get a proof of concept on the copper tubing before planning out the rest of the loop.

3. Don’t be afraid to change your plans

I will guarantee you that most of the build logs you read across the web or videos you see online involve a lot of changed plans that may or may not be documented. The individuals behind the builds likely didn’t show you their entire planning process, including having to change plans. And I highly, highly doubt that all plans they had going into the build were maintained through it.

As I documented across the build log, I’ve had to change plans. A lot. I had a number of ideas in mind going into this, and a lot of them didn’t work out. I originally planned to have the reservoir mounted externally on a 140mm UN Z3 bracket on the back of the case with the pump sitting on top of the power supply. Then I discovered there wouldn’t be nearly as much room as I originally thought due to the lower graphics card.

I wanted to have the 240mm radiator laying on the floor of the case. I had an inkling going into this that it wouldn’t fit with the new power supply, so I had to change it so the radiator was on the front. This meant my original idea for how to mount the pump and reservoir would also have to change after seeing they would need to be mounted internally.

I even had to change the drainage system. Twice! With the second time being while I was doing the first leak test on the full loop.

So many plans, ideas and decisions needed to be changed through the course of this build – I know I didn’t document all of them. Changing plans does mean spending more money, which means…

4. Don’t purchase everything up front

If you’re going to be switching out fans, I’d say get those ordered first and get as many installed as you can. Work on the system little by little if possible. Then decide on your water blocks and radiators first and get those ordered. Decide on where your radiators will go. Everything else needs to be planned around those, including the pump and reservoir. Plus the blocks and radiators can easily be over half the cost of your loop, so getting those out of the way is going to be a good thing. Be sure to read reviews and watch review videos as well.

What you should not purchase up front are the fittings. Even in the original loop I built out back in March, the fittings were actually the last things I bought, and in my next loop that’ll hold true as well. The loop needed to be planned first, then the fittings acquired. Fittings can easily send your budget into the red, even if you’re just going with soft tubing and flush compression fittings. Because chances are you’ll discover something in building out your loop that you did not consider going into it.

One thing you’ll notice with the build log is actually how slowly things progressed until nearly the very end. I decided to change the fans after doing some research, so I bought those and got them installed.

5. Budget for contingencies

Back when I was in late elementary school into middle school, there was a cartoon series on television called “Darkwing Duck“. In one episode, DW’s adopted daughter Gosalyn is sleepwalking around town (video here), having a very imaginative dream about historical events because, as the character Astroduck notes, she was “lazy and wanted a shortcut to avoid studying history”.

Anyway, Gosalyn notes toward the end of the episode while still in her dream: “You should never let a minor setback stop you and nobody ever lands right where they plan to.”

It is only with experience that you can plan out things well enough in advance that few of your plans will need to change during the course of building out a loop. Chances are you will never become that experienced. Chances are, neither will I. Regardless of how much you read online, or how many videos you watch, you will not be able to overcome your inexperience and the ignorance that comes with it. It’s just something you’re going to have to live with, meaning you need to insure yourself against it.

And the only way you can insure yourself against it is to keep some room in your budget to account for it. This is something that should be common sense, but then, to borrow the oft quoted phrase, common sense tends to not be that common. Given that in building out two loops I’ve had to in both instances overnight something seemingly at the last minute, and overnight shipping prices are likely going to be significantly more than what you’re overnighting, again you need to account for the possibility.

* * * * *

Inventory

You can see the current parts inventory, minus the water cooling equipment, on PCPartPicker. Here are the components of the water cooling loop:

Radiators: AlphaCool XT45 240mm and 360mm
Pump: AlphaCool VPP655 w/ AlphaCool HF D5 top
Reservoir: Assembled from these parts:
Bitspower Water Tank Z-Tube 100mm (BP-WTZACT100-CL)
Bitspower Z-CAP I (BP-WTZACC1-CL)
Bitspower Z-CAP II (BP-WTZACC2-CL)
CPU: Koolance CPU-380A
Graphics cards: 2 x EK FC-660
EK FC Bridge, dual serial 3-slot CSQ Plexi
Tubing: Type L Copper annealed tubing
Fittings PrimoChill Rigid Revolver, Nickel plated, Silver/Black
Swiftech 90-degree swivel elbow adapter, chrome
Swiftech 45-degree swivel elbow adapter, chrome
Bitspower valve, shining silver
Bitspower mini-D plug, shining silver

Gun confiscation

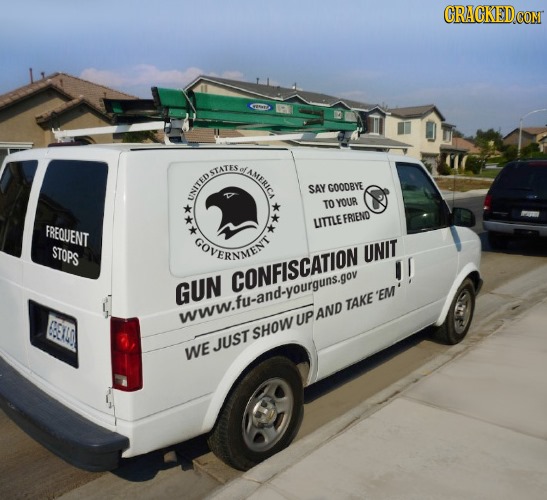
Cracked.com recently ran a series called “If Every Lie on the Internet Was True“, in which this picture was included:

The lie here isn’t that government agents will actively confiscate guns, it’s that gun rights supporters say that government agents will actively confiscate guns.

Here’s the thing, outside Alex Jones and a few other conspiratorial nutjobs, no one is saying this will happen. In fact the platform people like Alex Jones and Glenn Beck enjoy is actually the reason it won’t happen. The last thing gun control and gun ban proponents want is Alex Jones and Glenn Beck having a reason to say “we tried to warn you” or “we were right all along, and you should’ve listened to us”.

The issue here is the definition of “confiscation”. Too many people think of confiscation as a person taking something from you, such as when a teacher confiscates something from a student. But like many words in the English language, “confiscate” has more than one definition. Here’s the other one (emphasis added): “to seize as forfeited to the public domain; appropriate, by way of penalty, for public use”. To appropriate, by way of penalty (although not for public use). In other words, give it up or face the consequences.

Remember when word of these first hit the news (from NBC News) after the TSA changed the rules, yet again, on what passengers were allowed to carry onto the plane:

This is also a form of government confiscation. But these fliers have no choice but to surrender these items voluntarily before being searched by DHS agents, where they would ultimately be seized if they weren’t surrendered up front. The difference between that and a firearm is failing to surrender a water bottle won’t get you sent to jail, as it’ll just be seized from you later. Failure to surrender a firearm you are no longer legally able to have within the timeframe the statute or law enforcement allows for surrender becomes possession of an illegal firearm, which is a felony in virtually every jurisdiction in the United States.

When a firearm you own is outlawed, you have two options: surrender it to law enforcement or sell it. Sure you can try to argue in Court how the law is an ex poste facto law, but by the time that argument comes around, you’ve already lost your firearm anyway.

That is what gun rights supporters mean by confiscation.

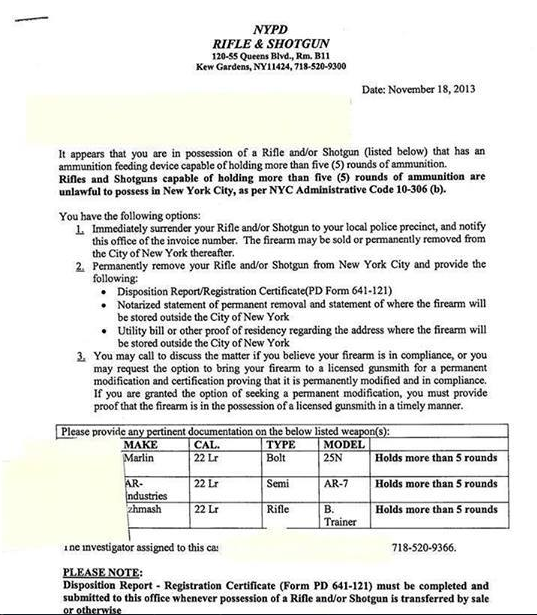
But there’s another statement that many gun rights proponents have said: “Gun registration leads to confiscation”. And this is another thing that has already been seen in recent years. Many States and jurisdictions have gun registration. After the passage of New York’s inaptly named SAFE Act declared illegal numerous firearms – along with requiring a background check to purchase ammunition or bring it into the State – law enforcement took to the gun registry to determine what registered firearms were now illegal.

Did they then go driving around to each person’s house to confiscate the now-illegal weapons? No.

Instead they sent form letters naming the firearms in question – including make, model and serial number – that were now illegal under the law and declaring that they had a certain period of time to surrender the firearm or lawfully transfer it out of the State.

This, folks, is what “gun confiscation” looks like. Not government agents going door-to-door to seize firearms, but law enforcement sending out letters demanding people surrender firearms, transfer them out of the State, or have them permanently modified to be in compliance with some law, with threat of arrest and prosecution if they refuse or fail to do so.

And whenever you hear of “gun confiscation” from a gun rights proponent, it is this to which we are referring.

But because gun control proponents have this insatiable desire to constantly portray gun rights proponents as if we are batshit insane, they’re going to still keep using the schoolhouse definition of “confiscate” when talking about firearms.

Project Absinthe – Part XV: It’s alive!

Build Log:

If you’re going to use Koolance’s coolant in your loop, don’t try using the little spigot that comes on the bottle. It’s worthless. Just pour it out into a jar and use a syringe to feed it into your reservoir. You’ll save yourself a bit of trouble.

But speaking of the coolant, as I suspected, Koolance said the amber bottle was not good. Thankfully Microcenter had a couple bottles in stock. My wife’s been waiting – as patiently as possible – for her system to be done since it was torn down last week. And I think having to order in more coolant would’ve driven her a little off the edge. So one bottle is going to Kansas City Water Services for proper disposal.

Draining the loop was again a little bit of a pain, as was filling it back up with coolant. But at least I was down to the point where I just needed to get coolant circulating.

It took a while for the vast majority of the air to bleed out, somewhere around an hour and a half before I unplugged the external power supply and got everything plugged up and booted the system.

There was also a last minute upgrade. I earlier purchased a Sound Blaster Z SBX sound card. Okay not exactly last minute, but I waited until everything else was installed and running reasonably stable before installing the card. It went into the last PCI-E slot on the mainboard. I’m still considering getting a RAID card, provided I don’t just put her hard drives into an external RAID enclosure to just get them out of the case.

And the temperature performance on this is phenomenal. Running Prime95 Small FFTs for about a half hour, the CPU got up to 48C. And running Valley Benchmark, the graphics cards got to 43C max. On World of Warcraft, the CPU barely broke over 40C and the graphics cards stayed under 40C with everything cranked up.

And the build is quiet. Very, very quiet.

A retrospective will be coming shortly where I’ll have additional pictures, specifications and parts, and some more discussion of the build.

Project Absinthe – Part XIV

Build Log:

For the record, trying to drain a loop that has a vertical radiator with its fittings toward the top is a pain. But that was necessary before I could pull the tubing. And will be necessary again before putting in the coolant.

Brasso is the polish of choice in shining up the copper tubing. It had its nice, shiny reddish coppery hue when it was polished up,

but had already gained a slightly darker patina by the time it was re-installed. But it still looks a hell of a lot better than before the polishing. To give you an idea of how bad it was, if you’ve never had to clean a brass musical instrument, consider yourself lucky. If you ever have, what comes out of a brass musical instrument after weeks or more of saliva making its way through the tubing, it’s similar to what was coming off the copper tubing emulsified in the polish. Yuck!

And I’m glad that it did gain a slight patina before being installed. My wife prefers that slightly darker hue, and so do I. The sharp copper color would’ve stood out too much against the mainboard. There’s still some contrast, but it’s not nearly as distinct.

In rebuilding the loop, I filled it with distilled water again to run that through. In cleaning the tubing, I used dish soap to clean the polish off the tubing and rinsed with tap water. There was very likely still some tap water left in the tubing, albeit only a small amount, but enough that I wanted to run distilled water through to pick that up and drain it out. It probably wouldn’t have mattered if I went straight to coolant.

Speaking of coolant, the Koolance bottles I purchased from Microcenter were a little concerning to me when I opened them and pulled them out of their boxes. In both cases there is a noticeable precipitate floating in the liquid. And in one case, what is supposed to be a colorless liquid is actually an amber color. I sent the following message to Koolance’s customer support:

Good day,

I purchased two bottles of Koolance coolant LIQ-702CL-B off the shelf from my nearby Microcenter. In opening the boxes for the bottles today, I noticed that the coolant in one of the bottles has taken on an amber hue while the other remains colorless. Both appear to have a slight precipitate floating in the coolant that is noticeable under light.

What could be causing the amber hue in the one case, and should I be concerned about that? Should I be concerned about the apparent precipitate as well?

So until I hear back from them about the coolant, it’s not going into the loop. Unfortunately to preserve the warranty on the CPU block, I need to use their coolant, so I’ll see what they say. Until then, things are likely on hold. I re-discovered after sending the message the note on Koolance’s page for the coolant that “It’s recommended to replace the coolant every 2-3 years, or immediately if there is any change in color or clarity.” I’m pretty much guessing that I’ve got two bottles filling both criteria. The one that is an amber color most certainly does, but we’ll see about the other one.

Project Absinthe – Part XIII

Build Log:

Finally the day arrives that I can finish tubing out the build. The night before I made sure to get some tubing from Home Depot. In the afternoon I made sure to remind my wife to walk over to the apartment office to pick up the package. All was pretty much set for when I got home. I knew what to do, I knew how to make it happen. It was just a matter of doing it.

Fittings to install. Only one line for tubing needed to be bent and run.

And there were some last minute changes to plans – aren’t there always? So what happened this time?

Remember the interesting drainage system I had that would originally have taken the drain through the floor? The 90-degree dual-rotary fitting that curved the flow down to the valve couldn’t get a good seal around the next fitting in the chain for some reason, and it leaked slowly. So I went for a slightly different option while just putting a stop fitting on the bulkhead.

I had already pulled and bent the tubing for the line going to the SLI bridge before doing this, but thankfully it was just a matter of flipping the tubing around. I didn’t even need to run adjust it in any way. Speaking of the SLI bridge…

Recall from the previous iteration on this build log that I had placed an order with Performance-PCs for 5 x 90-degree single-rotary fittings. I needed two for the SLI bridge, one for the CPU block, and the other two were going to be on the radiator. Well there ended up being a small change of plans.

The two 90-degree fittings forming an S-curve of sorts actually put the line too low on the radiator inlet. But I had two 45-degree single-rotary fittings that I tied together to make a dual-rotary fitting and used that instead. Problem solved.

Along with that, the way I was originally going to tube up to the SLI bridge I wasn’t entirely comfortable with, so this turned out to be fortunate. The two 90-degree fittings were moved to the inlet on the SLI bridge to offset it perfectly for the run from the pump. Initially I had the line going parallel with the floor out of the acrylic block fitting and curving up to the SLI bridge. In changing the drainage system, I changed it so it went up from the acrylic block then parallel to the case to meet up with the 90-degree fittings shown above.

The line coming out of the radiator back to the reservoir was pretty straightforward.

The 90-degree tubing on the right is a fill line going into the reservoir. Only temporary.

Once I got the drain port changed over, the leak test went very, very well. Unfortunately it seemed to be taking a while to bleed. Draining it is interesting because of the upright radiator with the fittings toward the top.

But we’re not quite done yet. Next up is pulling this whole thing apart so I can polish the tubing, then re-assembling and doing a quick leak test to ensure everything is how it should be. Then it’ll be filling it back up with the Koolance coolant and doing some temperature benchmarks.

Project Absinthe – Part XII

Build Log:

While waiting for the overnight order to arrive, I took advantage of the fittings I did have to see if I could get tubing bent for the two runs I wanted to clean up. Everything is to be torn apart eventually anyway, so this provided a slight bit of practice. Beyond that, having tubing already measured, cut and fit before the fittings arrived would speed up the process immensely.

I had some scrap tubing left over that I was able to straighten and use to run some test cutting and fitting. The line connecting the pump to the SLI bridge I was able to get fitted, so that’s one line down. Unfortunately that one came about from overcutting the line I was attempting to fit from the CPU to the front radiator: I was trying to run the tubing to the top port out of the radiator as opposed to the facing port. But in overcutting it I was at least able to salvage it to get the line for the pump to the SLI bridge.

The tubing that originally came from the CPU to the front radiator was repurposed as well. I cut the 90-degree bend off it and shaved it down to create a new 90-degree bend coming off the radiator to feed into the reservoir. In trying to undo that original connection, I’m definitely glad I redid it. I also decided to leave the fittings in place till the order arrived. It’ll need to come out for the polishing, but I’ll wait till then to take it down.

Getting the last line run would require more tubing, and as this was done on a Sunday when Home Depot closes early, I would have to wait till the next day to pick it up.

Earlier in the day before deciding to try the tubing, I managed to finish up the cable management for everything except the pump and get the back onto the case. This pretty much means that the only thing left is to plug the pump up into the rest of the system once the water loop is done.

* * * * *

I also had a re-think about the loop. One thing that I was pleased to discover when I initially tubed up the loop was how well the outlet on the top radiator lined up with the CPU block with just a Swiftech 90-degree single-rotary fitting. And given that the front and top radiators are both aligned similarly in the case, I kept wondering if I could get a similar alignment to avoid having to make complicated bends in the loop.

In making some test measurements, I observed that the facing ports of the front radiator about line up perfectly with the lower clips on the memory slots.

So I’m thinking that having a 90-degree single-rotary fitting on the outlet for the CPU block going down and across – a single 90-degree bend in the tubing – should get me in the ballpark for lining up with a port on the front radiator. What should allow me to hit home on that is two more 90-degree single-rotary fittings to make an S configuration. I have a Swiftech extension fitting if necessary.

Basically I’m hoping to use fittings to avoid multiple bends in the tubing like I tried previously (and failed). All of the other lines in the loop are single 90-degree bends, so figuring out how to get it so all lines are that way would make things look a little more uniform, and it’ll be significantly easier to build out. This also meant taking advantage of a feature Performance-PCs has on their site to amend an order to add two additional Swiftech 90-degree single-rotary fittings to the order I already placed for three of them.

It also means changing the outlet for the radiator to the other side, but that’s only a minor concern with probably some minor adjustment to the copper tubing.

And that is where I’ll have to leave this iteration, as there isn’t much to do until the order arrives. The cabling is virtually done, most of the tubing is already cut and ready to go, though I’ll need to get more for the last tubing run, which can’t happen until I have the fittings. About the only thing I could do in the interim is move the radiator outlet to the other side, but as that’s a minor thing, I’ll wait till later to do that.