Desert Sapphire – one year later

Build Log:

My wife and I drove out to the Las Vegas metro to revisit Desert Sapphire, the custom external water cooled build that I built for a friend of my wife’s. The system was due for maintenance, and as the owner doesn’t know how to maintain the loop, I declared a vacation at work to drive out.

I expected to be driving out to flush the loop, change out the soft tubing, and fill it with fresh coolant. That’s not exactly what ended up happening.

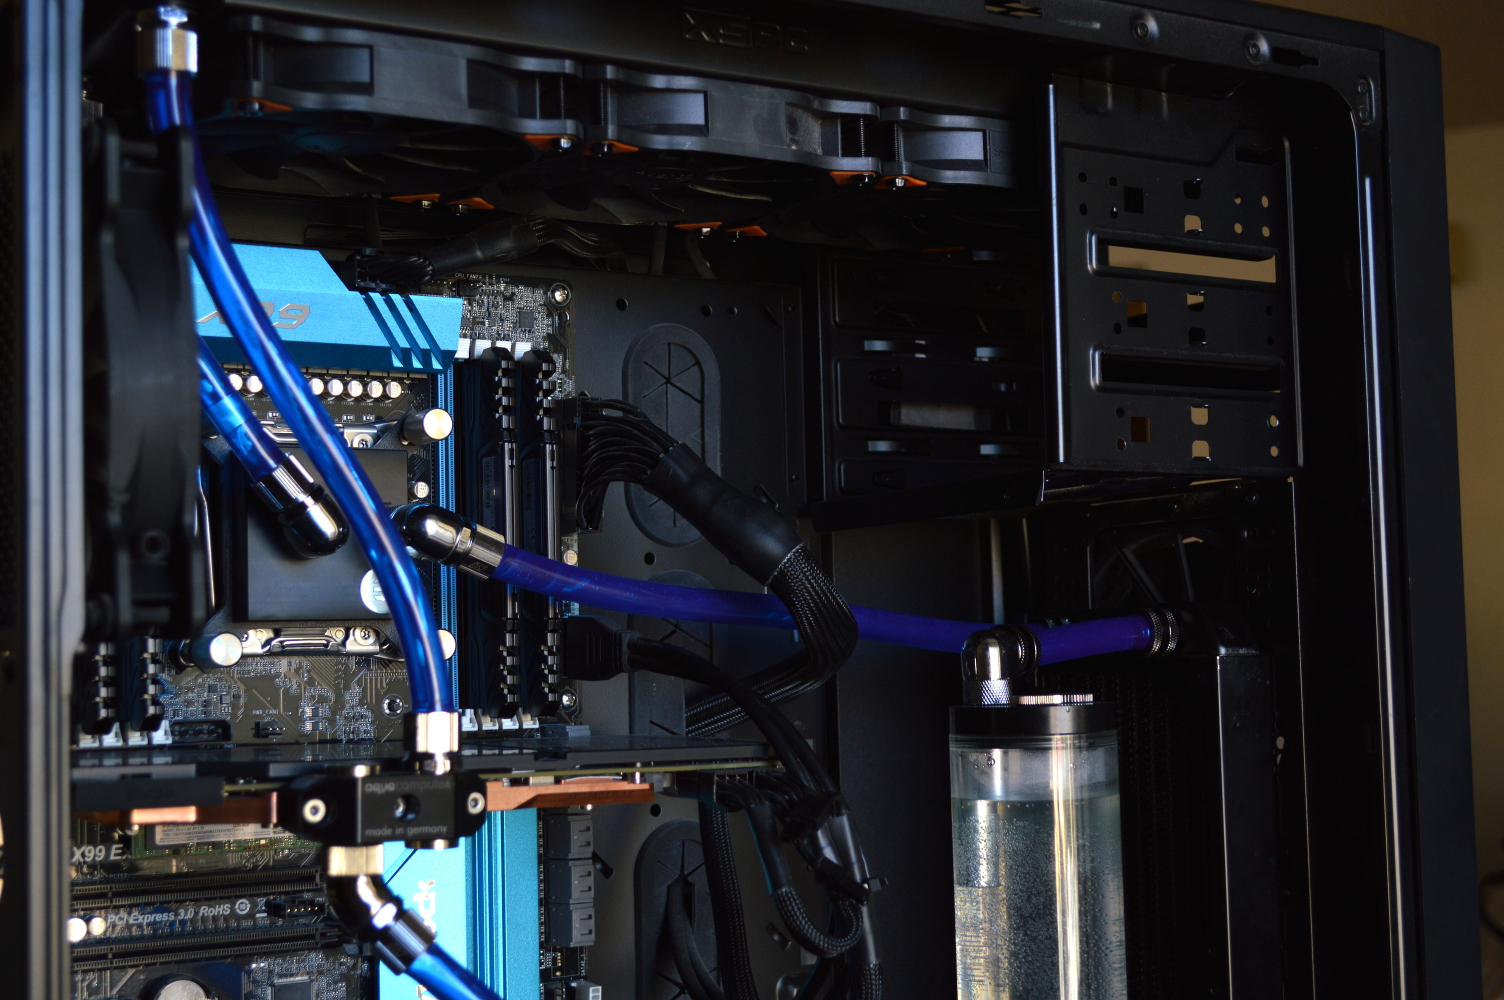
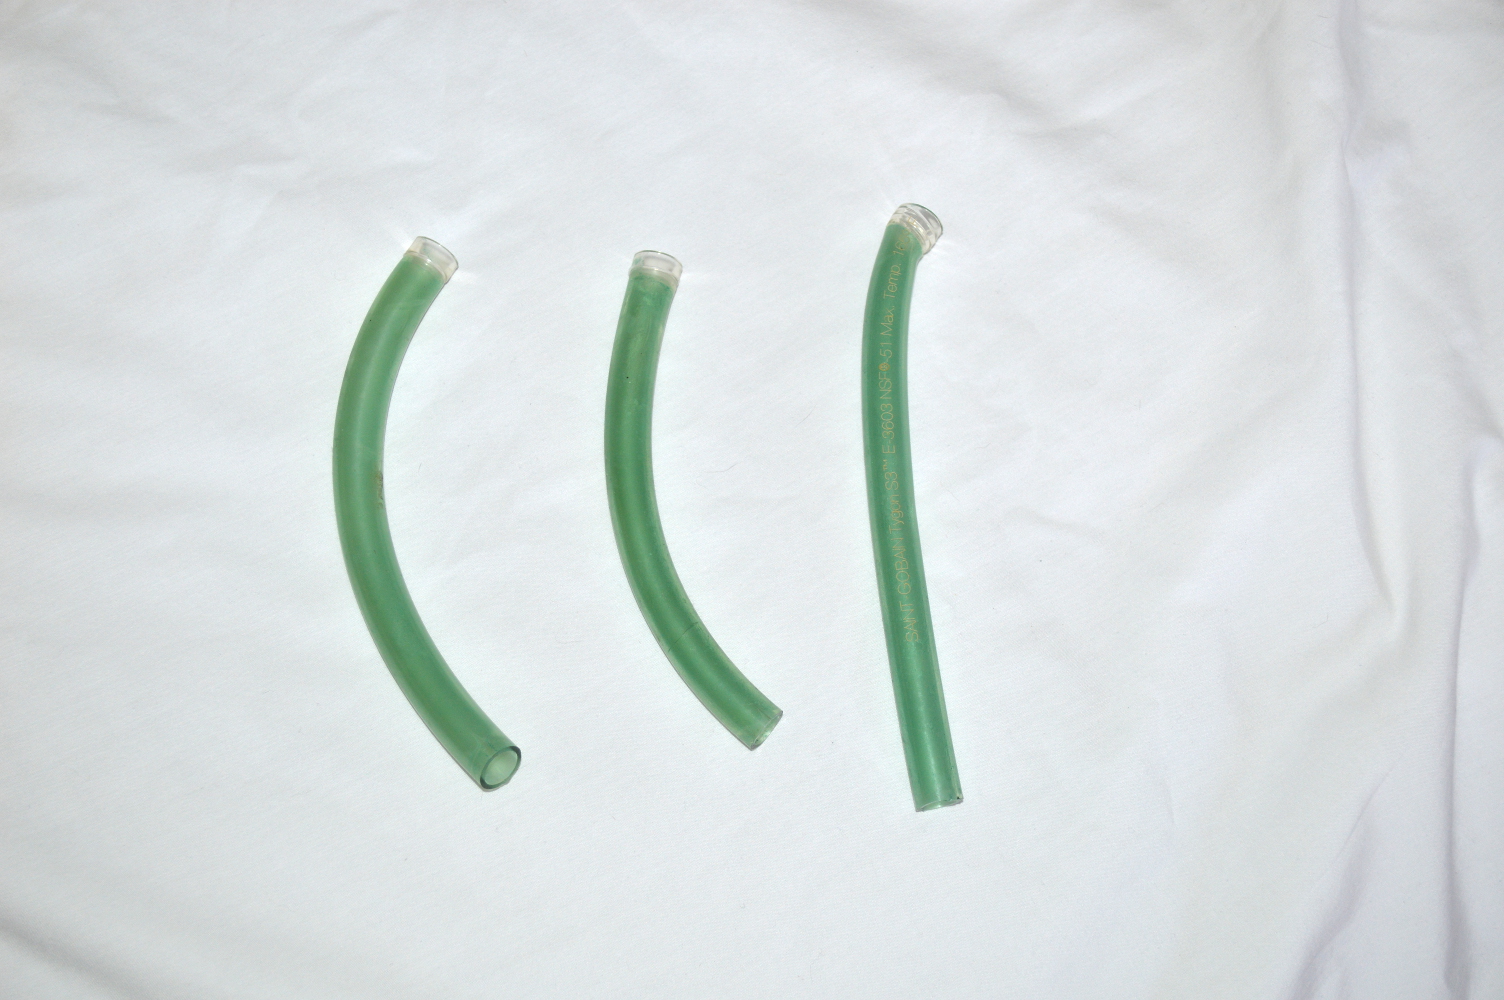
Green tubing?

I expected to be replacing the soft tubing. I didn’t expect to find this.

How exactly does Tygon tubing turn green when you’re using a coolant with an anti-corrosive and anti-microbial? And it’s hard to tell if this is green from chlorophyll or copper. Looking at pictures of copper patinas, I’m leaning toward the latter. Either way, it means the coolant should’ve been changed a lot sooner than this. The tubing was also strangely softer than before.

I stopped using Tygon not long after Desert Sapphire was done simply because it seemed to lose its “softness” too quickly. I’ve instead swapped to exclusively using PrimoChill’s soft tubing.

So that was used this round. PrimoChill Primoflex Advanced LRT. UV Blue. I intended to use clear tubing, but couldn’t get ahold of it in time. I naively thought Micro Center would have it in stock, and an earlier order to Performance PCs didn’t include it either since I, again, naively thought I’d be able to get it at Micro Center. And I didn’t think the Performance PCs order would ship and arrive before departing for Las Vegas.

But the coolant is staying the same. Everything else is staying the same on the system. This revisit was about maintenance, not upgrades.

Tearing down and rebuilding

So tearing the system down was relatively straightforward. As was draining it. I’ve had a lot of practice courtesy of having my own external water cooling setup.

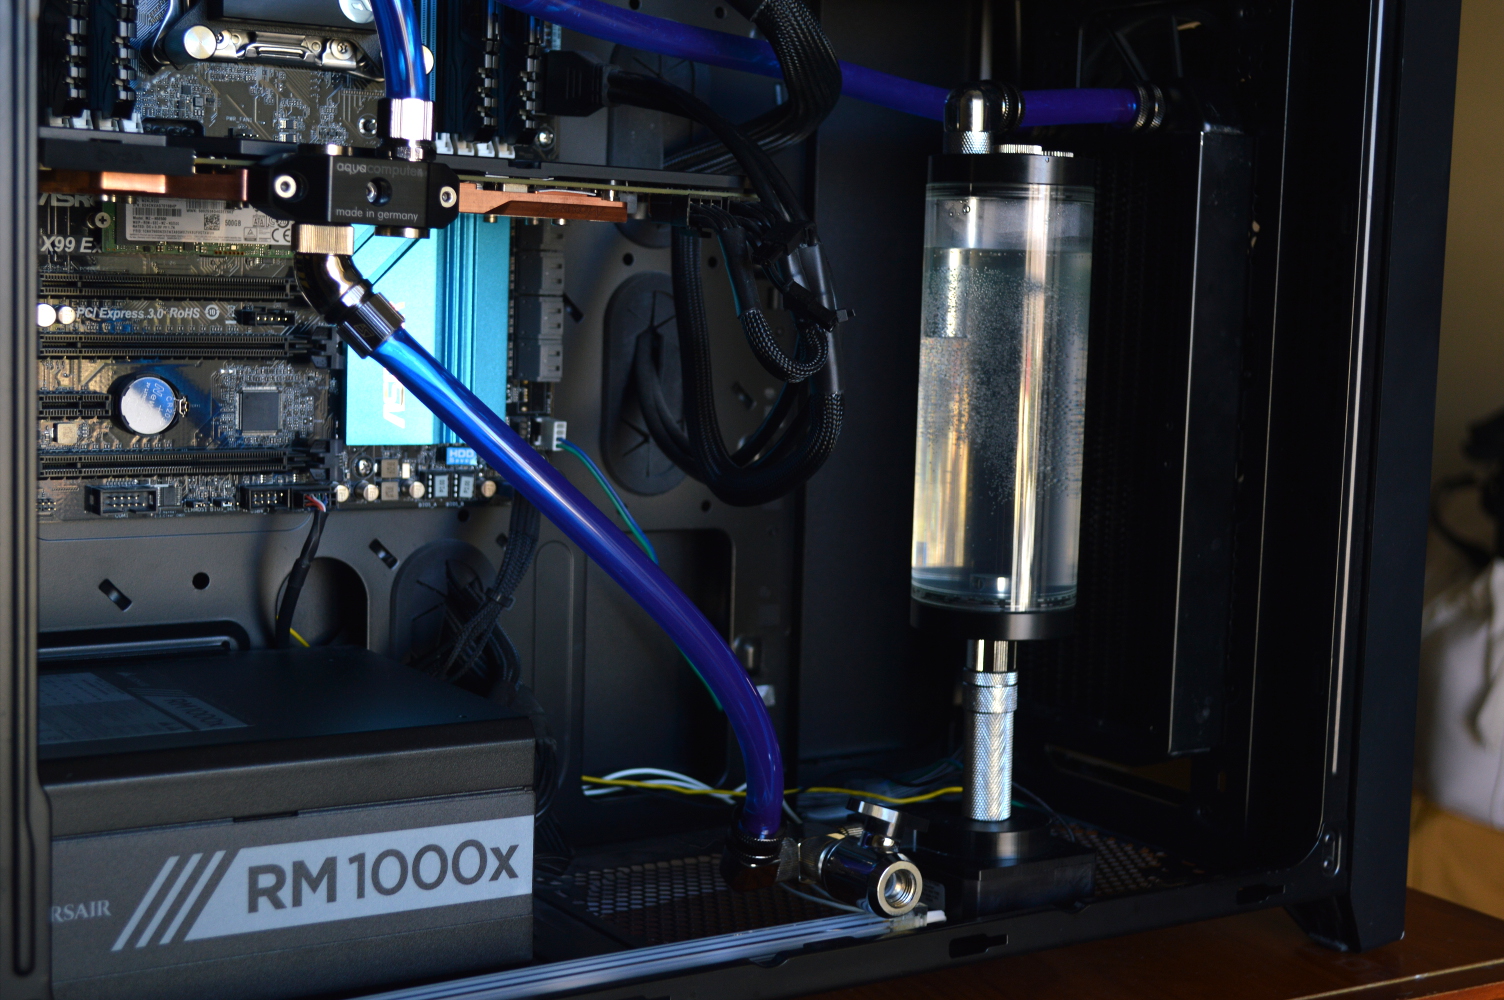
I decided to not do the external setup this time, instead moving everything internal. Given the temperatures, I didn’t think it to be much of a risk. The power supply, however, meant there wouldn’t be room for a lower radiator like in Absinthe. Instead there was room only for a front and top.

And rather than use a double-120mm radiator on the top, I paid a visit to OutletPC to acquire a triple-120mm radiator. Specifically the XS-PC EX360. The same radiator I used in my radiator box. Along with a few more fittings.

This setup takes him from 6x120mm to 5x120mm, which is still overkill for an i7-5820k and a GTX 980. Heck just the triple-120mm would likely be overkill.

I used 30lb Gorilla tape to stick the pump to the bottom of the chassis. The rest was just a straightforward water cooling loop. Which given what I’ve done with Absinthe and Mira, and what I originally built as Desert Sapphire, that’s certainly unusual.

Now the chassis also doesn’t look so barren. At least there’s something filling in the space between the mainboard and front panel, even if it’s just the reservoir and pump.

Another pass by Mira – V

Build Log:

In looking at the article hits, I’m now leaning toward creating a couple project summary articles, basically TL;DR versions of the build logs I have.

First though is a revisit of Mira and the radiator box system I have. Mainly I was concerned with creating a different method for hooking up the tubing at the same time I was replacing the tubing. I didn’t want long pieces of tubing snaking over to the radiator box, but something a little more… direct.

Recall that the inspiration for this project is AntVenom’s video regarding his basement water cooling project. In that project, he ran the coolant (just plain distilled water with copper sulfate) through two long copper pipes into his basement.

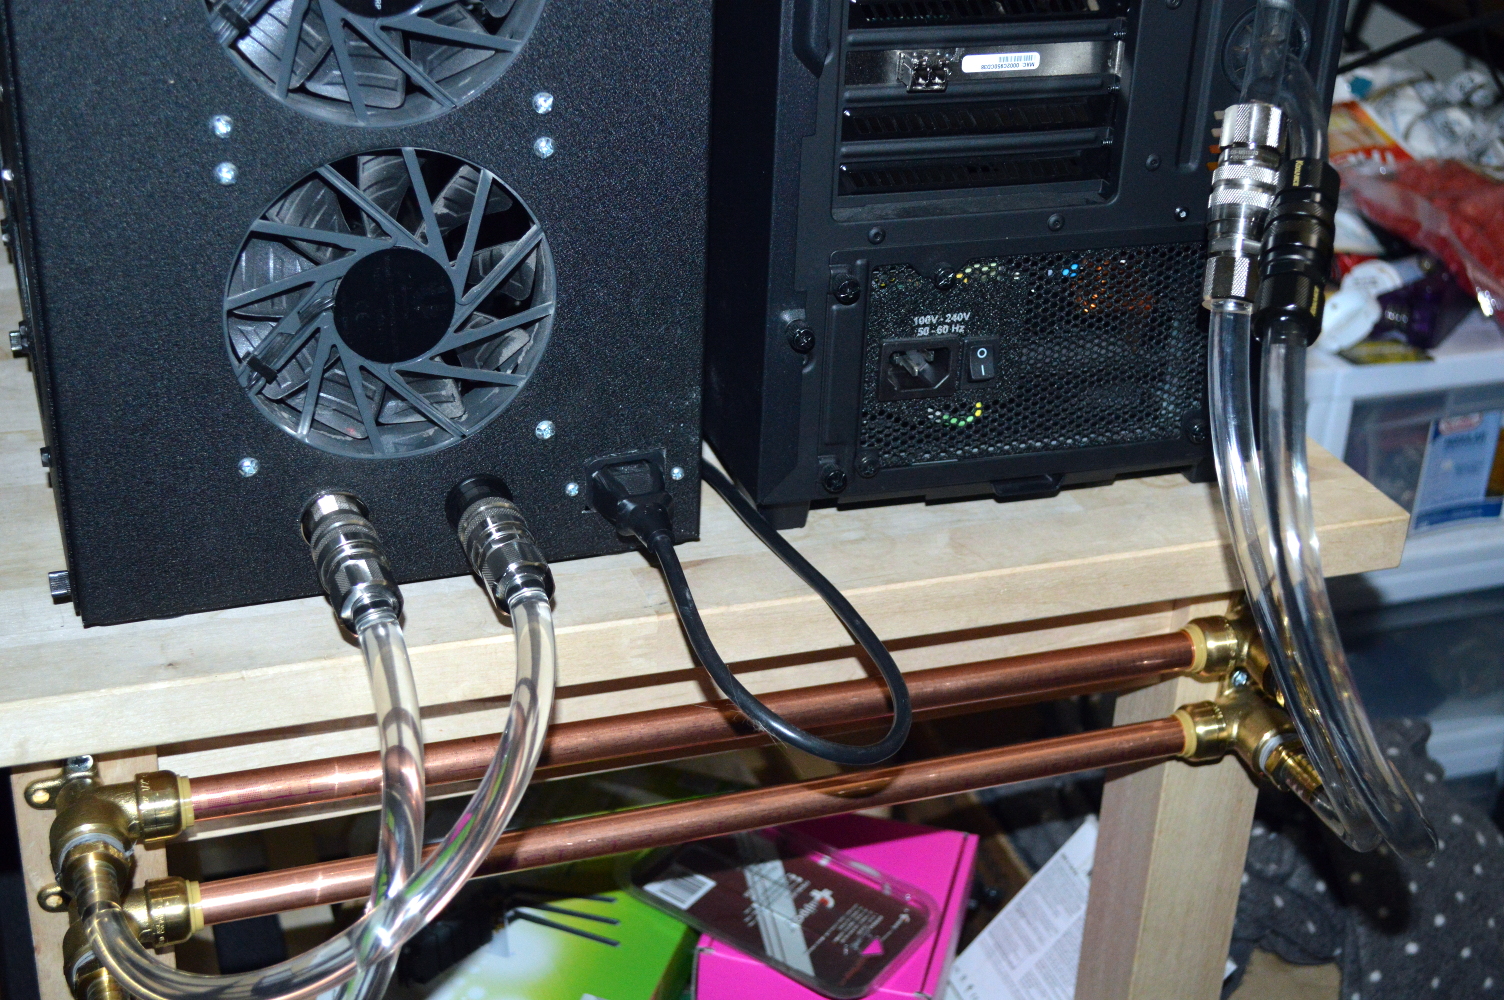
I live in an apartment, so I obviously can’t do what he did. But I can take the concepts and still apply them. First a parts layout (with Home Depot item numbers):

  • 2 x ½” Type M copper pipe – 24″ (311316)
  • 4 x SharkBite ½” push-to-connect to ½” FIP drop-ear elbows (300833)
  • #10×1″ wood screws to secure elbow fittings
  • 4 x ½” MIP to ⅜” barb (149408)

I want the external tubing out of the way of the power cables, primarily, since the previous setup had them crossing over both power cables.

So why not just use longer lengths of tubing? Where’s the fun in that? In all seriousness, this is a much more direct solution to the concern without having something else that needs to be tied away. Sure it would’ve been less expensive to use tubing and just have pipe hangers tying them down.

But it would’ve used a lot of tubing as well. As it stands, I went through about more than half a 10′ coil of PrimoChill Primoflex Advanced LRT with all the tubing in this setup. Including the tubing inside the radiator box and H440. Trying to use tubing for all of it, in place of the copper pipes andlong enough I could tie it out of the way, likely would’ve used all of a 10′ coil, if not more. And that tubing isn’t cheap — 27 USD for 10′ online, 32 USD at my local Micro Center.

Plus I kind of like showing what can be done with water cooling.

The screw mounts are one nice feature of drop-ear elbow fittings. On these fittings specifically, they’re large enough for a #10 wood or machine screw. No need for additional pipe mount brackets. Just two of those for each pipe, plus two barbs.

I could easily see this setup with longer pipes to relocate the radiator box away from the H440. Such as below it. Having the H440 sitting on top of my desk with the the radiator box sitting on a small table or apparatus below my desk. The only concern there would be whether the D5 Vario could handle that setup. And I doubt it. But stronger pumps exist: D5 Strong, and the PMP-420 or PMP-500 from Koolance.

But there’s still more to come!

In the latest iteration, I added a temperature probe to the return line on the top radiator. This probe is from an XS-PC temperature display combination, and is by coincidence in an XS-PC T-fitting I’ve had for a while. I don’t have it connected yet as I have no way of mounting it in the radiator box. Plus it runs on the 5V line on a standard 4-pin Molex, and the power brick only supplies 12V. So I need another voltage converter. And some means of connecting all of that up.

I’ll be having the plate to mount the display custom cut likely via Ponoko. I’ll have it cut for two displays, one for the return from the system and the other for the return from the radiator.

Overclocking the CPU

On the Sabertooth X99, I had the BIOS “auto-overclock” the CPU using the TPU feature. Specifically I set it to “TPU II”, which set the boost to 4.1GHz (originally 3.6GHz). For coolant in the system, I’m using distilled water treated with PrimoChill’s Liquid Utopia, which comes with the retail packaging of the PrimoChill Advanced LRT tubing.

Under load with another Handbrake encoding, the CPU topped out at 57°C on the hottest core, but typically held steady a few degrees lower. Running a combined Furmark with Handbrake, the CPU got up near 60°C during that test but didn’t touch it, while the GPU never went above 38°C.

  • Unigine Valley (Extreme HD): 4326 [4239]
  • Unigine Heaven (1080p, everything maxed): 2612 [2612]
  • 3DMark Firestrike: 16936 [16461], Graphics: 20101 [20109]
  • 3DMark Sky Diver: 40476 [38902], Graphics: 66493 [66747]
  • 3DMark Cloud Gate: 36567 [33628], Graphics: 129069 [129349]

Original benchmarks in blue. The graphics scores on 3DMark were within margin of error over previous scores. The Heaven score is identical to previous, but that’s due to Heaven not being very CPU bound. I observed such when running it after upgrading to the X99 platform while retaining my GTX 770s. All other scores saw a boost.

I could probably overclock it beyond 4.1GHz. But that would also raise the temperatures, likely well into the 60sC. Which would push me to up the pump and fan speeds to compensate. Which would add noise to what I intend to be a quiet, yet high performing setup.

10 gigabit home network – Summary

Build Log:

Last updated: May 27, 2019

If you want to bring 10GbE into your home network, and keep it on a low budget, you really don’t need all that much.

First question to ask: how many computers are you connecting together? If you’re wanting to connect just two systems, you need just two network interface cards and a cable to connect them. Any more than that and you’ll need a switch.

Network interface cards (NICs)

eBay is where you’ll find the NICs for very cheap. Most of the surplus cards available are Mellanox. But you need to be a little careful about what cards you buy. Some part numbers may give you trouble, as these are rebranded cards even though they have the Mellanox chipset. Stick to Mellanox part numbers where you can.

For single-port Mellanox 10GbE cards, look for part number MNPA19-XTR. I’ve had good luck with Part No. 81Y1541, which is an IBM rebrand, I believe.

Cables and transceivers

You basically have just two options here: direct-attached copper and optical fiber. While most videos and articles on this push you toward direct-attached copper (and some eBay listings for NICs include one), consider optical fiber instead. It’s just better in many regards. And if you want to connect systems that are more than 10m apart (by cable distance, not linear distance), it’s pretty much your only option.

You’ll need 10GBase-SR transceivers, two for each cable. You can find these on eBay as well, and some SFP+ cards listed may come with one already. These transceivers use LC-to-LC duplex optical fiber. I’ll provide parts options below.

Switch

A very inexpensive (about 150 to 200 USD, depending on seller), quiet option for small setups is the MikroTik CRS305-1G-4S+IN, which has 4 SFP+ 10GbE ports and a GbE RJ45 uplink. It also supports GbE SFP modules for combining GbE and 10GbE.

If you don’t mind spending a little more money, MikroTik has a 16-port 10GbE SFP+ switch that supports 1GbE SFP modules: CRS317-1G-16S+RM. Which is a great option for combining 10GbE and GbE connections in one backbone using RJ45 SFP GbE modules.

An in-between option is the MikroTik CRS309-1G-8S-IN, which is an 8-port SFP+ switch with a GbE RJ45 port that can serve as an uplink.

I previously used a Quanta LB6M. You can find it for as little as 250 USD depending on seller. The only downside is the LB6M doesn’t make combining GbE and 10GbE in one backbone easy. And the stock fans on it are LOUD. And replacing them with quieter fans means the switch will run much hotter than normal due to lack of airflow.

In January 2019 I switched over to a MikroTik CRS317.

Now if you insist on going RJ45 for your 10GbE network, MikroTik has recently introduced a 10-port RJ45 10GbE switch that retails for less than Netgear’s least-expensive 8-port option: CRS312. Note, however, that RJ45 10GbE cards are currently still more expensive than SFP+ cards.

SFP vs SFP+

When purchasing switches and modules for your network, you need to be mindful of the difference between SFP and SFP+.

SFP is for Gigabit Ethernet connections only. This means if you buy a switch with SFP cages on it, those SFP cages will not deliver faster than Gigabit speeds.

SFP+ is required for 10 Gigabit Ethernet. This means for 10GbE, you need an SFP+ switch, SFP+ modules, and SFP+ transceivers.

So if you buy a switch with mostly SFP cages on it, such as the MikroTik CRS328, expecting to build a 10GbE network, you’re going to be very disappointed.

My setup

I have four systems connected to a 10GbE network: Absinthe, Mira, Nasira, and my dual-Opteron virtualization server.

I use 30m cables to connect Absinthe and Mira to the switch. Nasira and the virtualization server use only 1m cables.

Purchase options

If you have any questions about parts or 10GbE in general, leave a comment below.

All whites are racist

On Facebook you’ve probably seen floating around a list of how Trump is making America great again. The list is kind of tongue-in-cheek, and asserts that the discontent for Trump will lead people to being more politically active. I did take issue with several of the points, however, and left this comment when a connection “shared” it:

A lot of these points are misrepresentations. There are still massive misconceptions to how the Federal government works. Racism isn’t dead, but it’s level is extremely exaggerated to where “all white people are racist”. The ACA is a lot more than insurance. People still don’t understand the totality of how Hitler rose to power, only bullet points made by people with agendas. Many words have completely lost their meaning and punch from overuse and misdefinition.

Another connection to that connection challenged me:

I’m curious where you are reading that “all white people are racist” because I haven’t heard anybody making that statement.

After a couple additional comments, I offered to provide references when I had a chance, and this also gives me a chance to determine just how widespread that idea has become. Or at least gain an idea since I’m not about to comb through all of Google’s search results.

I first encountered the “All whites are racist” sentiment several years ago, though I can’t recall where. At that time, one could rightly call it “fringe” and “radical”. But it was gaining traction even then. My first encounter with that came not long after my first encounters with identity politics within atheist circles, the zenith of which can be traced back to “Elevatorgate”.

So how widespread is the belief that all whites are racist? Let’s start with a Google search of the phrase “all whites are racist” (without quotes). Google Trends shows interest peaked in mid-October last year, around the same time that a student at the University of Wisconsin-Madison started a shop on Etsy to sell hoodies, one of which had the phrase “All White People Are Racist”.

I’ll limit what I provide here to just the United States.

On October 14, KFOR-4, the NBC affiliate out of Oklahoma City published an article in which a Norman, OK, teacher said during a lecture “To be white is to be racist, period.” The incident was picked up by other media sources around the country.

On June 8, 2016, United Church of Christ published an article on “white privilege” which said of whites, “Recognize that you’re still racist. No matter what.” Around that same time, Media For Justice posted an article also saying, plainly, “All whites are racist.

At Pomona College in Claremont, California, a poster was raised called “How to be a White Ally” that said, “Understand that you are white, so it is inevitable that you have unconsciously learned racism. Your unearned advantage must be acknowledged and your racism unlearned.”

Going back further to January 2015, AlterNet also published an article with the blatant headline, “Yes, All White People Are Racists — Now Let’s Do Something About It“. In March 2015, a Michigan blog called “State of Opportunity” wrote an article with the headline “Why all white people are racist, but can’t handle being called racist: the theory or white fragility“. It was espoused by a State Senator in Nebraska. Jennifer Morber of Quartz said that science says whites are “probably racist”.

And it’s even graced the New York Times. So the idea is definitely widespread, and likely gaining further ground.

So what is going on behind all of this? Why are all whites suddenly being labeled “racists”, even if individual whites have never had a racist thought to their recollection?

It comes in part from racism being redefined by the hard left. The dictionary defines racism two ways. The first evokes images of the KKK and Nazi Germany: “hatred or intolerance of another race or races”. The second is a little more elaborate:

a belief or doctrine that inherent differences among the various human racial groups determine cultural or individual achievement, usually involving the idea that one’s own race is superior and has the right to dominate others or that a particular racial group is inferior to the others.

But that’s not how it’s being used anymore. Instead bigotry in general is being defined as “prejudice plus power”. The “power” component is what is key. And that definition is being used to shelter minorities and women from accusations of racism and sexism, respectively. That women by definition cannot be sexist due to “patriarchy”, and blacks cannot be racist by definition because of… slavery and segregation.

On YouTube, Roaming Millennial has a good overview and rebuttal to that concept:

Speaking of YouTube, that is easily where the idea that all whites are racist is gaining the greatest amount of ground. Indeed one of the more recent examples was with MTV and their video “Dear White Guys” (since taken down, mirror available here), in which one actor says quite clearly, “And just because you have black friends doesn’t mean you’re not racist. You can be racist with black friends!” Ugh…

But the idea isn’t new. And according to the National Association of Scholars, the twin ideas of “all whites are racist” and “only whites can be racist” can be traced to the University of Delaware in 2007, but the idea of explicitly excluding blacks from the definition of racism goes back further.

So I think that’s all I really need to show here. I think I’ve established that the idea is taken seriously by a not-insignificant number of people.

Another pass by Mira – IV

Build Log:

Last we left off, I said I was going to change out the pump and make some other modifications to the radiator box. One of the modifications includes a more stable reservoir mount:

Full disclosure: I support Singularity Computers through their Patreon.

I purchased this initially for a large distributed computing build. But since that project is going in a different direction, I thought it’d be best instead to use this mount here in the radiator box. It’ll be a hell of a lot more stable than trying to use the standard EK reservoir mount with UN Z2 brackets. And it’ll look better as well.

Plus the silicon inserts will help prevent some vibration transfer to the chassis. And the use of additional silicon washers between the mount and radiators should damp it further. In the previous iteration I mentioned vibration transfer from the pump to the reservoir.

I swapped the Koolance D5 Strong (PMP-450S) for the Koolance D5 Vario (PMP-450) in the same housing. Virtually everything else remained the same in the radiator box. For now at least. I was only concerned at this point with getting the pump swapped. I made the reservoir mount swap simply because I needed to disassemble the setup when another EK fitting decided to leak. More on that later.

I set the pump at level 3 running at 12V and turned the fans up to 7.5V. And it runs very quiet, virtually inaudible sitting not even a yard from it.

As expected there was vibration transfer from the pump to the bottom panel, but it is significantly reduced from the D5 Strong and didn’t radiate out to the edges of the panel and to the sides of the box. Overall definitely a win.

Temperature testing

Ambient temperature was 76°F (24.4°C). Coolant was distilled water with a few drops of copper sulfate.

For the GTX 1070, the power target was maxed out in EVGA Precision XOC but the clocks not modified. I again ran Furmark for 30 minutes. Temperatures touched 38°C, but held steady at 37°C. This is only a touch warmer than with the D5 Strong at 12V. Before swapping the pump, I actually spent a day the previous weekend playing Doom (2016). The graphics card never hit 40°C, and the game was running for, easily, nearly 10 hours straight when accounting for breaks (the pause menu isn’t exactly stressful).

So this gives me reason to believe I can do something like that again.

For the CPU test, I again ran a Handbrake video conversion that lasted over 20 minutes. The hottest core touched at 45°C, as did the package temperature. Like the previous test, none of the cores held at their max temperature, instead holding around 40°C or 41°C. Occasionally touching a couple degrees higher, but never for long. So the temperatures on the CPU were a few degrees higher than with the D5 Strong.

So overall, as expected, the temperatures were a little higher than with the D5 Strong. But the Vario is noticeably quieter than the Strong, especially at level 3, which is about middle on strength with the pump.

Overclocking

To overclock the graphics card, I set EVGA’s Precision XOC to a manual voltage/frequency curve and had it auto-detect. This allowed for a boost clock of 2126 MHz, a nice boost over the original boost clock of 1987 MHz (advertised boost clock for this card is 1784 MHz). I added 500MHz to the memory after getting driver crashes at 550MHz. I’m not interested in dialing it in any further.

Previous benchmark scores without the overclock are in blue. During benchmark testing, the core temperature never reached 40°C.

  • Unigine Heaven (1080p, everything maxed): 2612 [2428]
  • Unigine Valley (Extreme HD): 4239 [3909]
  • 3DMark Fire Strike: 16461 [15780], Graphics: 20109 [18942]
  • 3DMark Sky Diver: 38902 [38362], Graphics: 66747 [63835]
  • 3DMark Cloud Gate: 33628 [33322], Graphics: 129349 [121253]

I’ll look at overclocking the CPU later to see how far I can go and how the temperatures look. Currently it typically sits at a clock speed of 3.6GHz.

Coming soon…

About the only thing really left to do is change out the tubing and perhaps some better cable management. Along with probably figuring out a way to mount bulkhead fittings in the H440.

I’m also not too thrilled with the fitting arrangement between the radiators. In taking the radiator box apart to change out the reservoir mount and pump, another of the EK fittings sprung a leak on the rotary assembly. I had a spare on hand (I bought two the last time this happened in case I needed to replace both at that time) so I didn’t need to make an emergency trip to Micro Center.

In swapping out the fittings, I made sure this time to not make the same mistake. I left loose the sealing collar on the SLI fittings until I had the radiator panel installed. This should avoid any potential stress on the rotary fittings that led to two of them leaking.

I want a better option.

The only better option, though, is a circular tubing bend. The diagram for the radiator puts the fittings at 15mm plus the distance between the fan screws. Which on the panel that distance would be 30mm. So 45mm (~1.75 in) between the fittings on center. I have a tubing bender for copper, but that has a center-line radius of 38mm, meaning a 180 bend center-line bend diameter of ~76mm (3 in).

So like a lot of this project, my option appears to be… going custom.

And this is in part the fault of the radiators I selected. In doing some math on the AlphaCool ST30 (of which I have two triple-120mm sitting around), the center distance between the fittings would be a hair over 2″. But I have another option that could prove fruitful that I’ll look to later.

Impeachment is NOT a political tool

From the Constitution of the United States at Article II, Section 4:

The President, Vice President and all civil Officers of the United States, shall be removed from Office on Impeachment for, and Conviction of, Treason, Bribery, or other high Crimes and Misdemeanors.

So far there have been only two Presidents subjected to impeachment: Andrew Johnson and Bill Clinton. Johnson was impeached for violating the Tenure of Office Act, which was a law passed against Johnson’s veto to ensure that Republican allies stayed on the President’s Cabinet and attempted to limit his ability to remove those officers. Clinton was impeached on several counts related to his deposition during the Paula Jones lawsuit, including perjury which is a felony practically everywhere in the United States.

Yet before Trump was even sworn in, many were considering impeachment as a means of getting him out of power quickly. Not for anything he actually did, but only because Democrats didn’t want him in office. In other words, it was little more than a political hissy-fit by those who didn’t like the fact their preferred candidate, Hillary Clinton, lost.

On Facebook I left this observation a few days before Trump’s inauguration:

Impeachment is supposed to be for “high crimes and misdemeanors” committed while in office. And while the definition of that rests with the House of Representatives, it’s not a power to be thrown around just because. It doesn’t matter if Pence is favored by Republicans. They’d be risking losing their majorities if they just willy-nilly impeached Trump the moment he stepped into office.

Democrats are looking for any way to keep the will of the States from becoming reality. They tried lobbying the electors, and that didn’t work. They tried objecting to the electoral college count, and that failed. Democrats, specifically Maxine Waters, are the ones leading the calls for impeachment. It’s a last ditch effort, the Hail Mary play from the opposing goal line, the long bomb thrown out of the end zone. Impeach him before he has any chance to do anything.

Impeaching the President of the United States is a serious matter. And is to be used for serious matters. That is why the language of the Constitution says “high crimes and misdemeanors”. In other words, the President should only be impeached for demonstrated violations of the law. And impeachment being brought up with Trump before he was even inaugurated shows that, at least to Democrats, impeachment is a political tool.

But then the left has been screaming “impeachment” ever since Clinton was actually impeached. They screamed it with Bush, so no surprise they’re now screaming it with Trump.

Again, though, impeachment is not a political tool. It is a serious tool for serious matters, and should only be used for serious matters. Johnson was impeached because he was continually interfering with the Republican-led Congress, and his alleged violation of the Tenure of Office Act gave them what they needed to impeach him. Johnson had he highest veto percentage and highest veto override percentage as well. And with Bush, it seemed every little thing he did or said should’ve resulted in impeachment articles according to Democrats.

And now with Trump, apparently the mere fact he won the White House is an impeachable offense.

Adjusting the recipe

Build Log:

Bitfenix specifications for the Spectre Pro place them at the upper-end of what would be considered silent. They’re rated 18.9 dB(A) for the 120mm, 22.8 db(A) for the 140mm. Put six (6) of the 120mm and three (3) of the 140mm in a full tower chassis with radiators, sit only a couple meters or less from it, and they are noticeably loud. A little north of 30 dB(A) if my calculations are correct, not including turbulence from the radiators.

I knew this from my previous personal build, Beta Orionis (β Ori). That system featured a water-cool assembly with copper tubing also using Bitfenix Spectre Pro fans. Though the fans were easily drowned out by my headphones.

But I wanted to quiet the system. At the time, the only reasonable option I had was undervolting them — running them at less than 12V — and I bought an inexpensive circuit board for that purpose. Hovering the fans at around 9V allowed the system to run virtually inaudible, but I wasn’t entirely comfortable with the temperatures.

And the pursuit of a quiet build led me to building an external radiator box. I’m very nearly there.

In a recent, now abandoned project, I discovered 120mm fans with specifications very similar to the Bitfenix Spectre Pro with two exceptions: slightly better airflow and reduced noise. The Nanoxia Deep Silence 120mm fans are the quietest 120mm fans I found that still provide 60 CFM. The 1300RPM 120mm fans are rated at 14.2 dB(A), and the 1100RPM 140mm fans are rated at 14.4 db(A). Having a not-insignificant number of these fans still won’t be whisper quiet, but they’ll be significantly quieter than the Bitfenix fans.

The two fans on the bottom radiator were not replaced as doing so would require draining and partly dismantling the plumbing. And I forgot to order one additional fan to replace the fan in the drive bays. That will come later, and the bottom fans will be replaced at the next loop maintenance.

Rack mount HDD enclosure — final and retrospective

Build Log:

Since the articles for this project are still getting hits, I figured it’s time to follow-up and talk about what ultimately happened with this project.

In short: nothing really happened with it. I’m not sure if it was the SATA port multiplier, or the eSATA controller or cable, but for some reason it just didn’t want to stay stable.

But I did keep to using an external eSATA hard drive as my primary drive instead of relying on something inside the case. This was in part due to the amount of water-cooling that was inside the chassis, the Corsair Obsidian 750D.

So ultimately I gave up on this project. There were too many additional complicating factors that, conspiring together, would not allow this project to function the way I hoped. The last update to this project was posted almost 2 years ago. The four WD Blue 1TB hard drives are now inside my primary system, in a chassis that properly supports a multi-HDD setup: the NZXT H440. The 60mm Noctua fans were moved to other systems, including a NAS I built into a 3U chassis.

And the custom chassis currently sits around empty while I decide what to do with it. I have a couple ideas in mind, and I might see if Protocase can cut just a new front and back for this for when I do repurpose it.

In short this project turned out to be an exercise in overthinking with heavy doses of inadequate research and consideration for other options. A heavy desire to do something custom overrode any consideration for whether that was the best course.

Back to the beginning

The path to this project started with an experiment on whether an external eSATA enclosure could be used as a boot device. I had little reason to think it wouldn’t work, but I couldn’t find an answer to the question by anyone who’d actually done it. I speculated that no one considered trying it or those who did just never wrote about it. And it worked.

Not too long thereafter, I ordered an external RAID 1 enclosure for Absinthe. That freed up a ton of space inside the case and made cable management significantly easier. Absinthe has since been upgraded a few times and uses an M.2 SSD as its primary storage, requiring no cables. The external enclosure is currently unused, but that might change soon to give my wife an alternative for storing her games library.

As I’ve said before, the only way to make cable management easier is by reducing cable bulk in the case.

It did not come without trade-offs. As I mentioned in the article I wrote on it, you are moving cable bulk from inside to outside your system. You’re still reducing it, as you need only one data and power cable, whereas inside the case you needed one data cable per drive and at least one power harness.

The enclosure I bought for my system (not Absinthe) was somewhat problematic. In the aim of moving toward a more robust solution, I purchased two additional single-drive external enclosures to set up in RAID 1 through the SIIG SATA RAID card I had. From observations, I speculated doing that with 4 drives in a RAID 10, but I didn’t want 4 individual external enclosures. I needed to consolidate it to one to keep the cable bulk on the desk to a minimum.

There are 4-drive cabinets available, including a 4-drive version of the RAID cabinet I bought for my wife, but I also decided I wanted to do something custom. Not really for any particular reason,  but kind of just for the hell of it.

Rack mounting

The main benefit of rack mounting hardware is consolidation. In one cabinet of however many rack units of height, you can have several systems all together in one vertical space, with a PDU or surge suppressor powering all of it.

Prior to the this project, my storage requirements were quite simple: RAID 1. 1TB hard drives are dirt cheap, and 1TB is more storage than most realistically need for a typical computer (I realize requirements do vary). My wife’s system has seen too many hard drives die from unusual circumstances that I wanted to take precautions such that should that occur again, I’d at least be able to recover her system without having to go through hours of reinstalling the OS, drivers and other things, along with days of her reinstalling her games and other stuff. RAID 1 was the easiest solution: two drives that are mirrored.

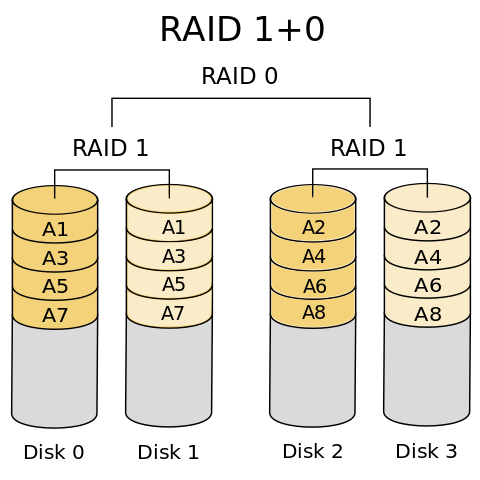
Again, though, the prices of HDDs didn’t escape my notice, so I decided to up the ante for my system by bumping up to RAID 10, which is two RAID 1 arrays with a RAID 0 running across those (image from Wikipedia):

RAID 10

This provides throughput second only to RAID 0, while adding the redundancy of RAID 1, and is recommended over RAID 5 as well due to the increased robustness of the array, among other reasons.

But then, how to house it? I didn’t want to buy or build a 4-drive cabinet for all of this, though I easily could have. I just really wanted to so something custom, so I started researching ideas. I kind of felt like Adam Savage when he talked about all of the research he did with regard to the Dodo that eventually culminated in him creating a Dodo skeleton purely from his research and notes.

The fact I was now starting to delve heavily into rack mount projects and enclosures also pushed me in that direction, mainly because there wasn’t much available for a 19″ rack that met my requirements at the time I started the project (late 2014 into 2015). While trying to figure out what I needed to go custom, I kept looking for available options, because there’s no point recreating what someone else has already done.

Since then, I’ve built a NAS, and that project illuminated a few potential options I didn’t previously consider.

The end result

So back to the original question: was it worth it? That depends on how you measure. I learned a lot going through all of this. I discovered a few things I didn’t know were available.

But the aftermath of a project is what allows you to discover whether you were overthinking things compared to your other options. And in that, I’d have to say the project actually was not worth the time and money spent.

The actual quote for just the enclosure at the time of the order was $355 according to Protocase. I got lucky in that I got an erroneous quote during a glitch in their system, so was able to get mine cut and shipped for a little under $200. One thing that might have cut down on overall expense would’ve been using essentially creating a mesh layout, but that probably would’ve increased the cost of the enclosure by more than the cost of the 60mm fans due to the extra machine time that would’ve been needed. A couple giant cutouts in which you’d install mesh of your own would likely be much better if you don’t want the fans.

So for $355, what is available off the shelf? A lot.

While designing the enclosure, I still kept a watch out for something suitable. I discovered two enclosures that would’ve been perfect but due to availability: Addonics R14ES and R1R2ES. Both were priced at under $300 and came with the interface card, fans and power supply.

One item I pointed out earlier was the 4-drive 1U rack mount enclosure by iStarUSA that is currently available through Amazon for around $300. It also comes with a power supply and fans (only 2x40mm in the rear). I’d need to add the port multiplier and SATA cables. The Addonics and iStarUSA enclosures also allow for easy hot-swap.

So in the end, I continued with the custom enclosure only due to a glitch in their system. Protocase very easily could’ve decided to not honor the price I was quoted — in which case you would’ve read about it here.

But beyond that, your better off looking for something off the shelf that can be used outright or adapted rather than going with something custom. If you don’t want to go with the iStarUSA chassis listed above or any other iStarUSA option, you can find a used rack chassis and adapt that. If you need it for desktop use instead of a rack, find a chassis with removable ears. Then just add hot-swap bays (optional), a port multiplier, and a power supply.

Basically as I’ve said in another build log, exhaust off-the-shelf options before going custom. And to be ready to abandon your custom option if a better off-the-shelf option presents itself.

Again, this project was an exercise in overthinking and inadequate research and consideration.
Another pass by Mira – III

Build Log:

In the previous iteration, I noted the pump got quieter with regard to vibration within the first 24 hours. I think this was merely due to the rubber needing to be loosened up before it could give its full isolation potential, as the isolation got better over time. The pump noise was never completely eliminated either.

So what else could I do about the noise and vibration? I conjectured swapping out the D5 Strong for the D5 Vario (likely at 12V, not higher). But I also could not determine if that could happen until I had the GPU block installed.

And then there was the matter of the case feet. I did a quick test to determine if better case feet would help with noise by resting the radiator box on a pair of dish towels. No difference. Even picking the radiator box up and holding it in the air didn’t make much difference to noise. But I figured the AcoustiFeet would still be a decent option and ordered them anyway as I could feel vibration being transferred to the table.

I also ordered anti-vibration silicone rubber washers. The aim was to also eliminate vibration on the fans in the radiator box. My primary concern lay with the three Bitfenix Spectre Pro 120mm fans pulling air across the box at the rear. They are held in with #8-32 screws without any kind of isolation. And the design of the Spectre Pro shell makes it impossible to use vibration isolating mounts. So your only option for vibration isolation is rubber washers.

I was not concerned about the bank of nine (9) Cougar CF-V12HB fans, since they have their own vibration isolation at the corners. Plus the entire bank becomes virtually inaudible below 9V unless you listen to them like a seashell on the beach. The Spectre Pro fans also become similarly inaudible at that low of a voltage, but there is still some vibration transfer to the chassis due to how it’s mounted.

Adding the GPU block

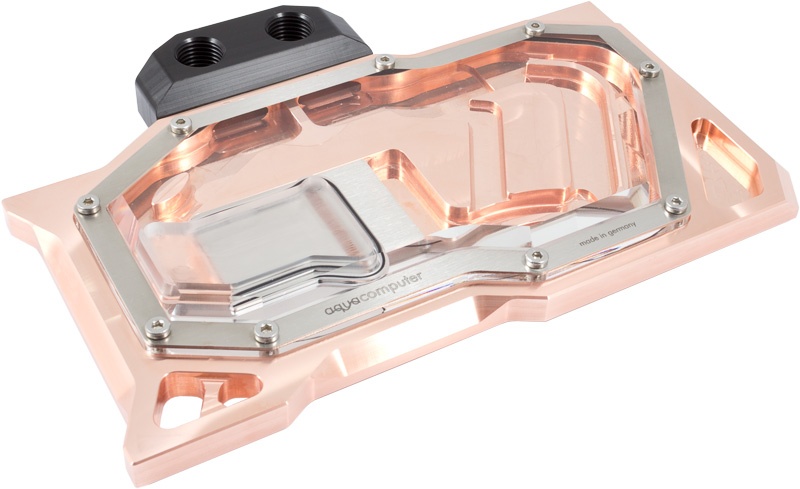
Thankfully I was able to order the block and backplate from a US supplier. Aquacomputer kryographics. Less expensive than EK while providing for about the same performance and quality.

So did this block provide so much resistance that I was forced to up the voltage on the pump for the sake of temperatures? Or was I able to swap out the D5 Strong for the D5 Vario?

Temperatures

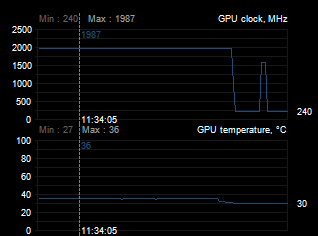
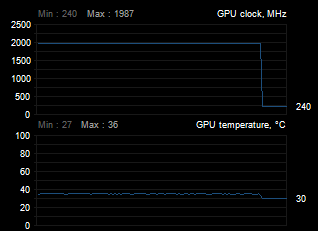
Initial temperature performance left me very optimistic about swapping out the pump. First, as you can see above the pump is at 12V and the fans are at 7.1V. The card is not overclocked, but I do have its power target set to 112% in EVGA Precision XOC.

Under Unigine Heaven on maxed-out settings and letting it run for the better part of an hour, the temperature leveled out at 36°C and the GPU clock topped out at 1987 MHz. And a 30-minute Furmark test showed similar, maxing out at 36°C, but fluctuating between 35 and 36. Again the clock topped out at 1987 MHz.

The passive blackplate was also noticeably warm to the touch near the voltage regulators. Airflow to the backplate is partly obstructed by one of my hard drives, but there’s no cause for concern here. I’m considering replacing the thermal pads with the better Fujipoly pads for better cooling on the voltage regulators.

So with these results, it is safe to say that I could swap out the pump for the potentially quieter D5 Vario. Flow would still be the overriding concern here, and if I had reason to believe the Vario wasn’t going to be able to keep up the flow, then I could send it above 12V or reinstall the Strong.

There are a few other smaller changes I’ll be making to the radiator box as well. I noticed there is some vibration being transferred up the tubing to the reservoir, so vibration isolation on the reservoir mount will be beneficial. And there will be some other minor changes related to cable management. In short, likely tearing the whole thing apart again, which will be needed anyway just to replace the pump.

Benchmarks

And now for some more benchmarks. Latest score is in black, my previous score with my pair of GTX 770s is in red.

Unigine Heaven – maxed out, 1080p: 2428 [1904]

Unigine Valley – Extreme HD, 1080p: 3909 [3743]

3DMark Firestrike: 15780 [12638], Graphics: 18942 [16091]

3DMark Sky Diver: 38362 [35005], Graphics: 63835 [54593]

3DMark Cloud Gate: 33322 [31911], Graphics: 121253 [102438]

3DMark Time Spy: 6143, Graphics: 6154

So not as striking an improvement moving from a pair of GTX 770s to the single GTX 1070. But from two graphics cards down to one and seeing a performance gain is still welcome. If this was a GTX 970, the gain would’ve likely been barely anything.

So still more to come with regard to changing out the pump and some other minor changes to the radiator box. I might even try overclocking the GPU and CPU to see what I can get out of it. The temperature performance of the loop gives me a lot of room to maneuver.

Quanta LB6M

Build Log:

So let’s talk about that 10GbE switch I bought on eBay.

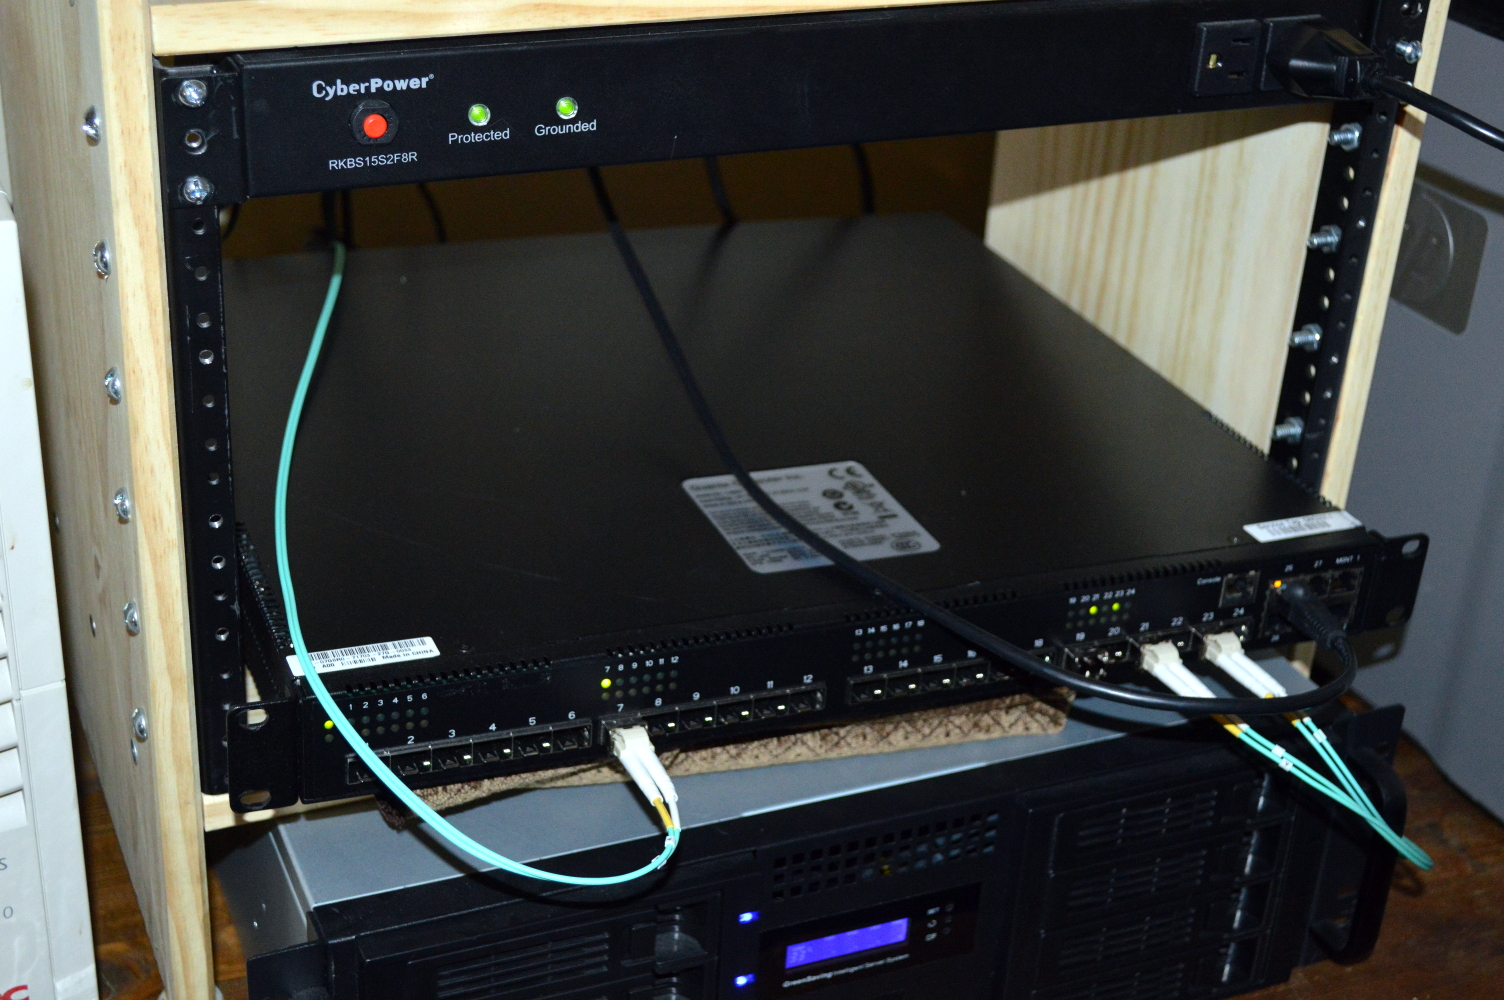
First, loud is too soft a word to describe this. It has two 1U power supplies and three 40mm fans. The pair of PSUs is for redundancy, so you can cut some of the noise by having only one plugged in. But given how loud they already are, the second power supply isn’t going to increase the noise output much.

You can probably tell from the picture that I have this sitting on something. It’s a folded up length of fabric my wife got a while back that she never used, so I’m using it as an anti-vibration rest. It helped cut the noise a bit as well.

The 40mm fans are, specifically AVC DB04028B12U. They are 4-pin PWM fans rated at 55dB/A and a massive 21 CFM (about 36 m³/h). Three of them are equivalent to shy of 60dB/A at full speed. They are PWM controlled, but even at the slow speed they were running, it was still way too loud. And there was a very noticeable, tinnitus-inducing high pitch to the fans as well given their small size.

Are these fans really necessary, though, or could they be swapped out for much quieter fans – ones that, unfortunately, have less than half, if not less than 1/3rd the air flow – without risking overheating the switch?

From what I can find online, it appears the fans can be swapped out without much risk. Provided the switch isn’t under a substantial load. The fans are mounted to an easily-removed tray, so no major surgery to get to them. But 40mm fans tend to be poor on airflow. Certainly nowhere near the jet engines that come with this. 21 CFM is what you’d expect from 60mm or 80mm fans, not 40mm. Most 40mm fans won’t even give 10 CFM!

Since I have only four systems connected to the switch, and they will not be under anywhere near a constant 10Gb network load, I’m considering this a risk worth taking. I found a few 40mm fans rated at about 20dB/A and a little over 6 CFM from Micro Center to try first. Plus the switch arrived on a Friday, so I didn’t have many immediate options for quieting this thing down. But three 20dB/A fans at full speed are still a hell of a lot quieter than even one 55dB/A fan at low speed. Plus it doesn’t have that annoying high pitch due to its lower RPM.

For a more long-term solution, I had another idea in mind: a pair of 60mm NoiseBlocker PR-2 fans mounted to the back. How? Using 40mm/60mm fan adapters. And I considered buying 60mm to 80mm adapters as well just to see how far up I could take this. But given how little of a load this switch will endure, I’m questioning if that will be necessary.

But that still left the power supplies, which are Delta DPSN-300DB power supplies with a power main connector I’ve never seen before. And I’m not going to attempt a fan swap on those, which would require opening the shell on the units. All too easy to touch the wrong thing and die.

As expected, the switch is working better than the custom switch, though I’m not seeing better throughput. But I didn’t expect to see better throughput. Such as with file copies from the NAS to my desktop system.

So then why buy the switch if I wasn’t expecting better performance, especially since I knew it was going to be demonstrably louder than my custom solution? For one, it has 24 ports meaning I have a lot of room to maneuver in the future. Currently only 4 of those ports are being used. But that could change later on.

And then there was also the flaky discovery of our Plex DLNA server with the custom switch. At least with Kodi, it was flaky. Indeed our phones and tablets had a hard time finding it through our wireless. Windows 10’s built-in DLNA and UPnP discovery was finding it consistently, so perhaps there’s something up with Kodi and how it does UPnP.

But this switch completely eliminated that problem. Kodi on my desktop, phone, and tablet consistently discovers the DLNA server. The flakiness is gone.

In Linux there are likely some networking settings I needed to tweak so Kodi could consistently discover the Plex DLNA server. But I’m past that now. I didn’t take on this project to become a networking guru. Which means, as you can probably guess, I’m also not using any of the management options this switch provides. Since I don’t need them. I just needed a 10GbE switch.

The only thing that’s really left is seeing what I can do to quiet this thing down more. And it seems my only option is a sound-proof cabinet. Which those aren’t cheap by any stretch. I found a 12U cabinet through StarTech.com that runs about 1,200 USD on Amazon. And that seems to be about the lowest cost on cabinets like this.

And the cost of rack cabinets in general is largely why I’ve typically taken to building them instead. I have 12U rails from when I intended to build a 12U cabinet, back when I was considering turning my desktop system into a rack-mounted, water-cooled system. So I’m likely going to look at another DIY option. The available cabinets imply that such a venture should be relatively straightforward, and I already have a couple design points in mind.

I know, that sounds a little hypocritical coming from someone who, in the previous section, said to always lean toward off-the-shelf options. But I did also say to do so if it’s at a price point you’re willing to accept. And 1200 USD isn’t a price point I’m willing to accept for a rack cabinet. Not even 1000 USD. Not when I know I can build it for far less.